Classic Fried Cornmeal Mush Recipe: Crispy and Delicious
If you’re looking for a comforting, budget-friendly dish with deep roots in American home cooking, few recipes are as satisfying as Classic Fried Cornmeal Mush. Crispy on the outside, creamy on the inside, and incredibly versatile, this old-fashioned favorite has been enjoyed for generations across the United States.
Made from simple pantry staples—cornmeal, water, and salt—cornmeal mush is transformed into a delicious meal or side dish once it’s chilled, sliced, and fried until golden brown. Whether served with maple syrup for breakfast, paired with eggs and bacon, or enjoyed as a savory side with dinner, fried cornmeal mush offers a unique texture and rich corn flavor that keeps people coming back for more.
In this guide, you’ll learn everything you need to know about making classic fried cornmeal mush, including its history, step-by-step instructions, serving ideas, storage tips, and expert techniques for achieving the perfect crispy texture every time.
What Is Cornmeal Mush?
Cornmeal mush is a simple dish made by slowly cooking cornmeal in water until it thickens into a porridge-like consistency. Once cooked, the mixture is poured into a loaf pan or dish and allowed to cool until firm.
After chilling, the solidified mush is sliced and fried until crisp and golden on the outside while remaining soft and creamy inside.
The dish has long been considered a staple comfort food, particularly in rural communities where inexpensive ingredients were essential for feeding families.
The History of Fried Cornmeal Mush
Cornmeal has been a cornerstone of North American cooking for centuries. Indigenous peoples cultivated and used corn long before European settlers arrived.
As corn became widely available, settlers adapted traditional cooking methods to create affordable and filling meals. Cornmeal mush emerged as a practical way to stretch ingredients and provide nourishment.
Throughout the 19th and early 20th centuries, fried cornmeal mush became especially popular in the Midwest and Southern United States. It was commonly served at breakfast alongside eggs, sausage, or syrup.
Today, many families continue making fried cornmeal mush as a nostalgic recipe passed down through generations.
Why You’ll Love This Recipe
Affordable Ingredients
Cornmeal mush requires only a handful of inexpensive ingredients that are often already in your pantry.
Crispy and Creamy Texture
The contrast between the crunchy exterior and soft interior creates an irresistible bite.
Versatile Serving Options
Enjoy it sweet or savory depending on your preferences.
Naturally Vegetarian
The basic recipe is vegetarian and can easily fit into various meal plans.
Great for Meal Prep
Cornmeal mush can be prepared ahead of time and fried when needed.
Ingredients for Classic Fried Cornmeal Mush
For the Mush
- 1 cup yellow cornmeal
- 4 cups water
- 1 teaspoon salt
For Frying
- 2 to 3 tablespoons butter
- 2 tablespoons vegetable oil
Optional Toppings
Sweet Toppings
- Maple syrup
- Honey
- Brown sugar
- Fresh berries
- Powdered sugar
Savory Toppings
- Fried eggs
- Sausage gravy
- Bacon
- Shredded cheese
- Green onions
How to Make Cornmeal Mush
Step 1: Boil the Water
In a medium saucepan, bring 3 cups of water and the salt to a gentle boil.
Reserve the remaining 1 cup of water for mixing with the cornmeal.
Step 2: Create a Cornmeal Slurry
In a bowl, whisk together:
- Cornmeal
- Remaining 1 cup water
Mixing the cornmeal with cold water first helps prevent lumps from forming.
Step 3: Add the Cornmeal Mixture
Slowly pour the cornmeal slurry into the boiling water while stirring constantly.
Continue stirring to ensure a smooth texture.
Step 4: Cook Until Thick
Reduce heat to low.
Cook for 10 to 15 minutes, stirring frequently.
The mixture should become thick and smooth, similar to a very dense porridge.
Step 5: Transfer to a Pan
Lightly grease a loaf pan or baking dish.
Pour the hot mush into the prepared pan.
Smooth the top using a spatula.
Step 6: Cool Completely
Allow the mush to cool at room temperature for approximately 30 minutes.
Then refrigerate for at least 4 hours or overnight.
The mush must be fully chilled and firm before slicing.
How to Fry Cornmeal Mush
Step 1: Slice the Mush
Remove the chilled mush from the pan.
Slice into pieces approximately ½ inch thick.
Rectangular slices are traditional, but any shape works.
Step 2: Heat the Pan
Place a large skillet over medium heat.
Add:
- Butter
- Vegetable oil
The combination creates rich flavor while preventing the butter from burning.
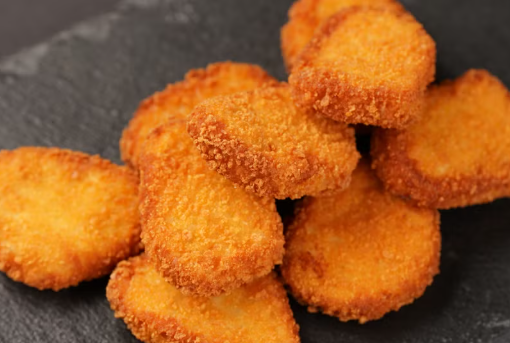
Step 3: Fry Until Golden
Carefully place the slices in the hot skillet.
Cook for 4 to 5 minutes per side.
The exterior should become deeply golden and crisp.
Avoid moving the slices too frequently to allow a proper crust to develop.
Step 4: Drain and Serve
Transfer fried slices to a paper towel-lined plate.
Serve immediately while hot and crispy.
Tips for Perfect Fried Cornmeal Mush
Use Medium or Fine Cornmeal
Medium-grind cornmeal creates a smooth texture while still providing a pleasant bite.
Very coarse cornmeal can result in a rougher consistency.
Stir Frequently While Cooking
Consistent stirring prevents lumps and sticking.
Chill Thoroughly
Proper chilling is essential.
Attempting to fry mush before it’s fully set can cause slices to fall apart.
Use a Heavy Skillet
Cast-iron skillets work exceptionally well because they maintain even heat.
Don’t Crowd the Pan
Leave space between slices to ensure even browning.
Sweet Serving Ideas
One reason fried cornmeal mush remains popular is its versatility.
Maple Syrup and Butter
Perhaps the most classic breakfast option.
The warm syrup soaks into the crispy exterior while butter adds richness.
Honey and Cinnamon
A simple yet flavorful combination.
Fresh Fruit
Serve with:
- Strawberries
- Blueberries
- Bananas
- Peaches
Fresh fruit adds brightness and natural sweetness.
Powdered Sugar
A light dusting transforms fried mush into a delightful breakfast treat.
Savory Serving Ideas
Fried cornmeal mush also shines as a savory dish.
Fried Eggs
Top each slice with a perfectly cooked egg for a hearty breakfast.
Sausage Gravy
A popular Midwestern favorite.
The creamy gravy pairs beautifully with the crispy cornmeal base.
Bacon and Cheese
Crispy bacon and melted cheddar create a comforting combination.
Breakfast Sandwich Base
Use fried mush slices instead of bread for a unique breakfast sandwich.
Dinner Side Dish
Serve alongside:
- Fried chicken
- Roast pork
- Meatloaf
- Grilled vegetables
Regional Variations
Different regions have developed their own versions of cornmeal mush.
Midwest Style
Typically served at breakfast with syrup or sausage.
Southern Style
May include richer seasonings and savory accompaniments.
Pennsylvania Dutch Version
Often features thicker slices and traditional breakfast pairings.
Appalachian Adaptations
Some recipes include milk or cream for a richer texture.
Nutritional Benefits of Cornmeal Mush
While simple, cornmeal mush offers several nutritional advantages.
Whole Grain Energy
Cornmeal provides complex carbohydrates that supply steady energy.
Naturally Gluten-Free
When made with certified gluten-free cornmeal, the dish is naturally gluten-free.
Low Cost, High Satisfaction
A filling meal that fits almost any budget.
Customizable Nutrition
Healthy toppings can increase fiber, protein, and vitamins.
Common Mistakes to Avoid
Not Chilling Long Enough
The most common issue is slicing before the mush has fully set.
High Heat Frying
Excessive heat may burn the outside before the center warms through.
Too Much Oil
Overly greasy mush loses its desirable crisp texture.
Thin Slices
Very thin slices can become fragile and break apart during cooking.
Skipping Salt
Even a small amount of salt greatly enhances flavor.
Storage Tips
Refrigeration
Store cooked mush in an airtight container for up to 5 days.
Freezing
Freeze sliced, unfried mush for up to 3 months.
Separate slices with parchment paper for easy removal.
Reheating
For best results:
- Fry again briefly
- Use an oven
- Reheat in an air fryer
Avoid microwaving if possible, as it softens the crispy crust.
Frequently Asked Questions
Is Cornmeal Mush the Same as Polenta?
They are very similar, but traditional cornmeal mush is typically simpler and made with fewer ingredients.
Can I Make It Ahead?
Yes. In fact, making it a day ahead improves firmness and makes frying easier.
Why Is My Mush Falling Apart?
It likely wasn’t chilled long enough or may contain too much liquid.
Can I Bake Instead of Fry?
Yes. Bake slices at 425°F (220°C) until golden and crisp.
Can I Use White Cornmeal?
Absolutely. White cornmeal creates a slightly milder flavor but works equally well.
Why This Old-Fashioned Recipe Still Endures
Classic fried cornmeal mush has remained popular because it combines simplicity, affordability, and comfort. It transforms humble ingredients into something truly satisfying, offering a crispy exterior and creamy center that appeal to all ages.
In a world of complicated recipes and expensive ingredients, cornmeal mush reminds us that some of the best dishes are often the simplest. Its adaptability allows it to fit into breakfast, lunch, dinner, or even dessert menus with ease.
Final Thoughts
Classic Fried Cornmeal Mush is a timeless comfort food that deserves a place in every home cook’s recipe collection. With its crispy golden crust, creamy interior, and endless serving possibilities, it remains a beloved favorite across generations.
Whether you’re revisiting a cherished family tradition or trying it for the first time, this easy recipe delivers satisfying results using just a few pantry staples. Serve it sweet with maple syrup, enjoy it savory with eggs and gravy, or experiment with your own favorite toppings.
Once you’ve mastered the basics, you’ll understand why fried cornmeal mush has stood the test of time as one of America’s most comforting and delicious homemade dishes.